DIY Electric Bikes

Amy Chan

When you’ve finally had enough of sitting in miles of traffic, watching car exhaust float off into the atmosphere, and you’re ready to do your part for the environment, one of the best things you do to reduce your carbon footprint is to stop driving to work. Biking to work is a great way to get there quickly while still impacting the environment. But if you encounter a big hill somewhere on your commute it might seem impossible. Putting an electric motor on a normal bicycle can help you make it up those big hills and the great news is that you can do it yourself.

The Basics

Whether you’re an amateur electrician or have never built anything before, a DIY electric bike is a project that anyone can complete. It’s a low-cost project that creates big results that are both fun and economical. Your parts will include:

  • Electric Mid Drive, 750 Watt Bafang BBS02 Kit with Led display and 25Amp controller and thumb throttle
  • 12 volt 20AH batteries
  • Smart LED balance boards
  • Series connector bars
  • LifeP04 battery charger
  • Battery box
  • Titan straps
  • Key starter switch
  • Inline 30 amp fuse and starter

Picking Your Motor

While geared hub or direct drive motors have been the most popular choice for electric bikes in the past, there’s a new choice these days. The mid-drive motor attaches to your back, wheel system and allows you to continue using the bike’s original rear derailleur when you need to change gears. You can find the right motor for your electric bike at The DIY Outlet.

This Old Thing?

If you’re worried about how you’ll afford some fancy bike for this DIY project, don’t even think about it. One of the biggest advantages of this project is that almost any bike you have can work. The one main stipulation for a bike is that it needs to have a 68mm bottom bracket shell width. You may also want to consider a few other things, though they aren’t mandatory. Having smaller wheels on your bike will usually mean they are stronger. Having more spokes in the wheels can make them stronger. Wider tires can create a smoother ride. If you’re worried about stopping on a hill, you might want to make sure you have front disc brakes on your bike. Also, having a bike that can support a decent amount of weight in the back will make it easier to hold your motor, batteries, and other parts.

Once you have your bike picked out, start by removing its’ chain, bottom bracket, and crank set. Some chains require a special took for removal. Then take a hex tool to the crank arms and a puller tool to take the crank assembly off the bike. Finally, take off the bike’s bottom bracket using the special screwdriver tool that matches your bike. At this point, you may want to clean your bike before you begin attaching new parts.

If you don’t happen to have all the specialty tools that are needed for disassembly, don’t feel shy about taking your project to a bike shop. Someone there will probably have the right tools and can take it apart in less than five minutes; they may not even charge you because taking it apart is so simple.

When the bike is disassembled, you can then attach the mid-drive kit. It should slide through the bottom brackets and then be screwed into place. Screwing it in can be difficult so make sure to check for any loose screws and know that it may have to be tightened occasionally.

The Battery Box

If you already have a rear rack, installing a battery box should be pretty simple. A cargo style rack is ideal and you can easily construct your own if you need to. Just measure your battery box and then build an outside container to hold it and keep it from sliding around. If it slides while you’re riding the bike, this can cause balance issues. Once you have something constructed to hold it, just simply use two Titan strips with screws to hold it in place.

Creating Your Battery Pack

Creating the battery pack for your bicycle can be one of biggest challenges of building your electric bike. There are several suppliers from which you can purchase pre-made, triangle-shaped, battery packs online and these are perhaps the easiest option when it comes to a battery pack for your electric bike. Most of them will cost you around $100. When you receive your batteries, make sure that you thoroughly test them. You may need to add your own connector bars between the batteries if you decide to construct your own pack. Be sure to cover the pack by wrapping it with duct tape and you can use packing material to wedge between the batteries and box. Next, you’ll need to add a key switch so that you can start your electric bike easily.

Final Touches

For safety and easy storage, you’ll want to add a few additional elements to your electric bike. A kickstand that is able to hold the bike’s weight is incredibly important. You’ll also want from and rear lights, including brake lights, and these can be run from the bike’s battery. A horn is also a great addition, for safety. Remember that your bike will never keep up with cars and because it’s likely you’ll have to ride in some traffic, you’ll want to have these safety elements installed before you take your new bike on the road.

Read more →

Remodeling your bathroom

Amy Chan

When undertaking this stressful and costly task, you absolutely must start with a budget.  With the right budget, you immediately are forced to take into account what types of materials you’ll have access to and those that might be a stretch.  A new bathroom can cost a fortune, and with all of the luxurious bathing and washing options out there, your budget will offer you a clear picture of what you can have, not what you want.  That being said, you can do a number of wonderful things to your bathroom on a tight budget that will impress your guests and keep your bank accounts secure. 

Just as you can refurbish your iPhone or an old kitchen cabinet, you can refurbish your toilets, tubs and sinks.  Not only will that save you heaps of money, but it will reduce your waste.  With a little love and a little molding, you can turn your old, disintegrating tub into a brand new looking, shiny and stylish one.  You can do the same for your all of your fixtures.  Consider the idea of updating your bathroom rather than remodeling it. 

Another great way to save money is to keep the same floor plan.  That means keeping everything in the same place.  If, in the course of your remodeling ambitions you decide that you’d like to put the sink over here and the bathtub over there, you’re going to start to really amass cost.  That’s because of the plumbing.  You don’t always think of the piping beneath your beautiful tile, but those are the heart and soul of your bathroom.  Once you start rearranging all of it, you’ll need to start hiring experts and you’ll need to buy more materials.  Keep everything in the same place, just update it all.  That will save you a fortune!

Many of us like to think that with the help of a youtube video or a DIY book, we’ll suddenly become experts on whatever we like.  To an extent, that’s true.  Any of us can learn to lay down tile, can learn to grout, and can even undertake some simple plumbing.  However, don’t’ get carried away with your ability to complete a remodel on your own.  Yes, you can save a lot of money when doing things yourself, and my readers know how much I encourage this, but when it comes to doing a remodel, you’d better make absolutely sure that you are going to get it right the first time or else you might be paying the pros to redo your hard work down the line. 

Lastly, you need to remember this one piece of sage advice:  Moisture is the great nemesis of your bathroom.  It is the fuel of molds and fungi, and those are the fuel for sickness, smells and just general discomfort.  During the entire process of the remodel, make sure that you keep everything as dry as possible.  Make sure that your pipes are tight and your feet are clean.  It couldn’t hurt to keep a fan or fans in your little construction site to minimize the moisture as well. 


Read more →

Hanging Art

Amy Chan

Hanging art is an art.  Heck, decorating is an art all unto itself, so it only follows that one must have an artistic sensibility to do a great job.  The thing is, not all of us has an artistic sensibility, most of all, me.    I can honestly say that I have good taste in artwork, so in that regard, I’m one step ahead of the game.  Also, good taste is entirely subjective, so what one person likes, another hates and that’s okay.  However, if you do know what you like and why, you have an advantage.  This gives you a starting point upon which to build.  So what do we, the unartistically inclined public do about such a conundrum?  Here are a few tips to consider when hanging your most precious pictures and artwork throughout your house. 

Find the right height.  I once heard that the center of all your pieces should be 57 inches above the floor.  This height is the average height of our eyes, so for most people, 57 inches makes any piece of art easy to appreciate.  Personally, I think hanging everything at exactly the same height offers a uniformity that I find boring.  Yes, it looks professional, and yes your guests will immediately appreciate the scientific approach you took if all of your frames are centered at that height, but I prefer a slightly more eclectic approach.  I like to take a piece, hang it at that height, and then put the next piece a little up or down from that.  To me, this requires the viewer’s eyes to be guided in an interesting fashion that will make certain details pop out that otherwise wouldn’t. 

Find the right theme.  I like to hang my pictures according to some kind of theme.  This keeps my walls organized in some kind of fashion.  You can organize by artist, or color scheme or content.  For example, in my living room, one of my walls is all pictures from a trip that I took to Portugal many years ago.  They’re some of the best pictures I’ve ever taken, and I’m proud to show them off to my friends and guests.  However, I’m also really into artwork.  I have a number of paintings done by compulsive artists.  These pictures are very busy and hyper-detailed.  It’s kind of difficult to look at them for too long, you might get a headache.  Because of this, I like to keep these pieces a bit more independent, with some breathing space between them.  My room has a lot of music related pictures and posters.  I like to go to concerts and I like to get the poster whenever I can.  It reminds of the night of the show and gives an inviting/biographical taste to my room.  I guess it just makes it more mine. 

My advice when hanging art is to start with these suggestions and then play around with them a little bit.  Plan the room out instead of just starting with one picture and then moving on to the next.  This way, you’ll be able to picture everything all at once.  Lastly, have a friend help you out.  You’ll be able to have him or her hold up your pictures and have the freedom to stand back and say, “higher.”  Or, “lower.”

Read more →

Make your home value rise

Amy Chan

If you own a home, you’re in pretty good shape.  Though the housing market has its ups and downs as we all well know, by and large, your house will increase in value over time and you’re in a good position.  However, there are ways that you can likely increase the value of your house efficiently and ways that you can just throw improvement money down the tubes.   Some people think that it’s a bit of guess work on what improvements to make on your house, but there a couple of hints and guidelines that will maximize your chances of increasing your house’s value and put you in an even better position. 

Projects that are most likely to increase the value of your home include updating your kitchen and bathroom.  This is because both these rooms are telltale signs of how modern the entire house is.  Cooking is increasingly chic and entertaining at the home is also more and more a desire for the new home buyer.  Someone who is perusing new homes really likes to picture what life will be like in their new residence, so a tactfully updated and a clean, spacious bathroom are key. 

It’s also important to reimagine some exterior parts of your house.  New siding or a fresh coat of paint will draw many otherwise distracted eyes to your door, and because selling your house is truly a numbers game, that’s exactly what you need to do.  When my mother and father sold their house a few years back, they invested a lot into landscaping the front lawn by adding gardens and stone.  Such improvements are attractive and can add tremendous value to a home.  Also, large landscaping improvements can be done very cheaply if you have a green thumb or are a DIY kind of person.  Personally, spending time in the garden is among my favorite things, so my folks were smart enough to enlist my “expertise” and I helped them map out a cheap way to beautify our house’s exterior. 

While there are some projects that will likely increase the value of your home, there are others that might be more of a waste of time and money.  For example, turning a garage into a family room or transforming a spare bedroom into an office could be very avoidable headaches.  For you, a spare bedroom could be better suited for another purpose, but to the buyer who might be thinking about having kids, that bedroom is exactly what they want.  Projects such as these will likely cost too much, involve an area of the house that people don’t use every day, and likely, these “improvements” will reflect more of your own personal tastes rather than those of a prospective buyer.  Leave these costs to the next owner, and focus your energy on those projects that will offer you the best payoff. 

Selling your house is a stressful and emotional task, so it’s important to approach it with a clear strategy that works best for you and your pocketbook.  Good luck!

Read more →

Planning your home for the future

Amy Chan

There’s planning for the future you want and then there is planning for the future that is coming.  If you ever think of your aging parents or peruse over old photographs of you with your grandparents and start to wax nostalgic, you know that age brings unimaginable joys and wisdom, but it also plunges you and the rest of us into the uncomfortable position of not having quite the independence we’ve come to know.  Both the good and the bad of aging take hold of all of us, but there are ways to meet these certainties with grace and ease if you just allow yourself to prepare. 

If your kids are off to college and you’re meditating on the idea of doing a little bit of a remodel, do yourself a favor and think a little bit further ahead than you want.  Keep in mind that one day you might not be able to get around with the vivacious efficiency that you do now, and that if you’re lucky, maybe even grandkids could soon accompany your chaotic and already loud thanksgiving celebrations.  When doing a remodel, think practically as well as aesthetically.  Instead of installing that marble kitchen floor you’ve often dreamed of, consider something that you could watch your grandkid fall on and not give you a heart attack.  Also, marble and tile can become dangerously slippery when wet, so think of alternative materials for your floor and counter tops that will make your future version of you a bit more at ease. 

When my folks remodeled their bedroom last year, I suggested that they get a bed slightly lower to the ground.  It’s not quite on the floor, but it’s an easy sit rather than an effort.  Right now, my parents are both pushing seventy years old.  They’re both tremendously active -- my mother tends a garden all summer long and my father still swims regularly at the community pool – but I know that won’t always be the case.  I know that one day, when a storm’s a brewin’ and my dad’s metal hip starts “actin’ up” that he’ll appreciate a bed lower to the ground that’s easier to get in and out of. 

In the spirit of looking for a way to make things easier, my ever so wise mother suggested making the kitchen and the bathrooms wheelchair accessible accessible.  Yes, I know that sounds weird, but let me explain.  Neither of my parents need a wheelchair, and hopefully neither of them ever will.  However, the chance isn’t out of the realm of possibility and that chance grows as they get older.  In that spirit, my mom made the walking areas a little bit wider, so just in case, a wheelchair would be able to maneuver easily if need be.  They also installed a handrail in the shower, because really, who doesn’t need one of those from time to time.  I often lament that I don’t when I get home late or have to wake up very early. 

I respect that growing older is a sensitive subject, but aging is something that we all go through literally every day.  It never hurts to balance your long term plans to incorporate both the blessings of aging and the not so romantic aspects of it as well. 


Read more →

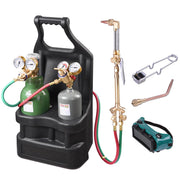
A Quick Guide To Soldering Stations

Greg Hector

Knowing how to solder is a must for any true DIY'er and its a lot easier than you think! Check out this beginners guide to soldering.

Read more →

Picking a Paint Color for Your Walls

Amy Chan

If you think back to your 6th grade art class, you might remember seeing a poster of the color wheel on the wall. Maybe you even spent a few days in class talking about it. It’s a simple concept which arranges colors chromatically in a circle, much like a pie, with each slice being a different color. The colors represented on the wheel are the same ones found in the rainbow: red, orange, yellow, green, indigo, and violet. Each of these colors can be broken down into different shades.

Be Affective with Complementary Colors

Colors located directly across from each other on the wheel are called complementary colors and these are basically exact opposites, like blue and orange. These colors can be used very effectively together, if you use one color more than the other. For example, many bathrooms feature lots of a light blue, which is cool and soothing, with small pops of orange in touches like towels, soap dispensers, or even a funky goldfish print shower curtain. Complementary colors can also be good choices in children’s bedrooms, to give them a bright, fun element.

Brighten Up Dark Rooms

If you’re dealing with a room that doesn’t have any windows, or does have windows but still doesn’t get much natural light, you probably want to pick a light paint color. Of course, classic white is always a good option but you can add personality by picking a light color with a little more flare. A robin’s egg blue or a soft yellow will work wonders for these types of rooms. Pastels are always a good choice if you are trying to lighten up a room. Bright colors in darker shades tend to have the opposite effect.

Try Bold Colors in Small Doses

If you’re used to playing it safe with grays and creams but are considering trying a bold color in your home, try out in a small area first. Paint a bathroom, a small hallway, or even just one wall, as an accent, in a bigger room. Then give yourself some time to see how you really feel about it. If it feels warm and inviting, then you should try it in a larger space. If it feels overwhelming, it’s probably not the right choice for your home.

Make Your Mood

When it’s time to paint, you should always consider the mood that you want to set in a room. Do you want the room to feel bright and fun? Small and intimate? Warm and cozy? Color plays a huge part in mood and not only that, but it will play a huge role in how you decide to decorate too. Choose a color that will make it clear how you plan to feel in a room. Creams and tans will make a house seem clean, bright, and inviting. Greys will make for a home that seems cooler. Bright colors will seem fun and exciting and are great for dining rooms or entertaining spaces. Whichever color you choose, it will set the tone for the time you spend in that room.


Read more →

Keeping Out the Cold

Amy Chan

The recent flight of families from the suburbs and back into the heart of cities has meant that many people are living in older homes. Many people are shocked at how older homes let in much more cold air than better sealed newer homes. But no matter the age of your home, sealing off your windows can keep cold air out and keep your heating costs down throughout the winter months. Here are a few options to consider when you get ready to seal your windows.


  1. Window Insulating Film: This is one of the most common ways to insulate your windows. The film is generally found to be pretty affective and is easy to come by because you can get it in virtually any hardware store, online, or even in some department stores. This plastic film is similar to shrink wrap and you affix it to the edges of your window with double stick tape before setting it in place with a blow dryer. This method is incredibly cost affective and the only real downside is aesthetic because your window is covered with film that traps cold air between the plastic and glass.
  2. Cellular Shades: Cellular shades for your windows are another good option for insulation. These shades allow light to pass through but keep much of the cold air out. These can get pricy because they are often custom made to fit your windows. If you’re interested in this type of insulation, you can take window measurements into most large hardware stores and they can have custom shades ordered for you.
  3. Rubber Sealing: Rubber sealing fits around comes in one long piece that you can cut to fit your own windows. Remove the backing and then stick it the edges of windows to close any small gaps that are letting in the cold, winter air.
  4. Draft Snakes: Draft snakes are homemade solutions to the problem of cold air leaking in under doors or around windows. You can easily make one by filling a tube with rice, then covering it in fabric. Push it against the bottom of your door or lay it in a windowsill to keep out drafts.
  5. Layers of Curtains: The more fabric you have covering your windows, the more cold air you’ll keep between the curtain and the window, instead of inside your home. This works the same way a blanket does. Cover your windows with heavy, thick curtains, the more the better, to keep out cold air during the winter.
  6. Caulking: Caulking outside your windows might be the most affective route to keeping out cold. This keeps the air completely outside, because the seal is on the exterior, rather than the interior, of your window.
  7. Shutters: This can be a bit costly, but if you’re really in need of a way to keep the cold out, this can save you money in the long run. Any way that you can put a barrier between your window and the cold air will help keep your home warmer, so having shutters and keeping them closed, especially at night, will help keep your energy costs down and your house warm and cozy.


Read more →

Hang Your Pictures without the Hang Ups

Amy Chan

If home projects aren’t your thing and trying to hang photos and artwork seems more like a terrible task than a fun Saturday afternoon project, you aren’t alone. Decorating your walls can be difficult; from trying to get things straight, to finding studs, to hammering nails into sheetrock and finding that they just won’t hold anything, it can be a complicated process. But once you’ve gotten your original paintings, your college photography, or your kid’s finger paintings framed and hung, you’ll be happy you did it and there are a few tricks that can help you avoid any big mishaps.

  • If you’re going to be climbing up and down a ladder to hang something, put a magnet in your pocket to hold any nails and screws so that you can avoid having to hold them in your mouth while juggling your picture and hammer.
  • Rather than measuring, place a piece of tape in between the two ends of your photo, on the back. Then remove the tape, stick it to the wall where you want to hang the picture and drill your holes at each end.
  • Put a packing peanut over the nail head to help you avoid hitting your fingers rather than the nail when hammering. Once the nail is in place you slip the peanut right off. You can also substitute a clothes pin if you don’t have any packing peanuts easily available.
  • If you don’t have any tape, you can also make a copy of what you want to hang (frame and all), tack it to the wall, and then drill where needed.
  • If you need to remove a nail, wrap a rubber band around the head of your hammer so that you don’t further damage the wall as you pull out the misplaced nail.
  • You can hold a nail inside the teeth of a comb to avoid hitting your fingers while hammering.
  • If you’re hanging frames with wire hangers, use a tape measure for any measurements, that way you can bend it and get an accurate idea of where to place your nails.
  • Make sure to arrange all of the artwork you intend to hang before actually planning it. Measure your wall space and decide where things will go, especially if you’re making any type of collage, so that you won’t mess up and be left with a wall full of nail holes.

  • Try using toothpaste. This method could get a little messy, but don’t overdo it on the toothpaste and you shouldn’t have any trouble. If the frame you’re hanging has small wire hooks on the back, dab each of them with toothpaste. Place your frame against the wall exactly where you’d like it to be hung. You’ll have small dots of toothpaste where you need to place nails. Hammer your nails into the wall, then wipe the remaining toothpaste from both the wall and the frame and place your frame on the nails for a perfectly positioned photo.

Read more →

Cleaning Your Ear Buds

Amy Chan

Over the past decade, most people have made the change over from big, bulky headphones to wearing tiny buds that fit right inside your ear. They’re everywhere these days. You can get a cheap pair at a convenience store, a nice pair at an electronics store, or a free pair with almost any new cell phone you buy. And though they come in every shade under the rainbow, a lot of times, with cell phones, you get a white pair, and these have become almost the standard for music listeners but with as much as use as most pairs get, they can quickly become dirty.

Dirty earbuds are a problem for lots of reasons. Not only do they look bad, but they can carry all kinds of germs, and since lots of people share earbuds (especially teenagers), they can easily spread sicknesses. Keeping your earbuds and other gadgets clean with this simple solution will go a long way in keeping your household healthier, especially during the winter months.

If you’re looking for a way to easily clean your earbud caps with products you already have at home, try to mix up this easy cleaning solution and then follow this guide to quickly clean your earbuds without worrying about any of that solution getting into the wires. This solution is also perfect for wiping all kinds of electronics and household surfaces if you keep it in a spray bottle. You can use it to clean your stove and counters, bathtub or shower, sinks, computer screen, cell phone screen, stereo equipment (hard surfaces only), dashboard, steering wheel, and other hard surfaces of your car, as long as you don’t get in any electronic elements like wiring.

  1. First, you’ll need to mix up your cleaning solution. This is the simplest solution you’ll ever make. Just mix ½ cup of water and ½ cup of vinegar. This is probably much more than you’ll need just to clean your earbuds but you can use it later for cleaning lots of other things around your home, your office, and even in your car.
  2. Next, go ahead and remove the small earbud caps from the headphone set itself.
  3. Pour some of your cleaning solution into a clean glass. You’ll want about one inch of the solution for the best results.
  4. Drop the caps of your earbuds into the solution and allow them to soak for at least 15 minutes.
  5. Next, pull the caps out of the solution and turn the rubbery pieces inside out.
  6. Pour out the dirty cleaning solution.
  7. Thoroughly rinse out your glass that contained the solution.
  8. Fill the glass with another inch of cleaning solution.
  9. Drop the earbud caps, now turned inside out, back into the solution.
  10. Allow your earbud caps to soak for at least another 15 minutes.
  11. Finally, remove the caps from the solution, dry them out, on both sides, using a clean rag and then put them back on the actual earbuds once they are completely dry.

Read more →